b
Fundamentals of Web-apps
Before we start programming, we will go through some principles of web development by examining an example application at https://fullstack-exampleapp.herokuapp.com/. Another version of the application can be found at https://fullstack-example.now.sh. You are free to use either one.
The applications are there only to demonstrate some basic concepts of the course, and are by no means examples of how web applications should be made. In the contrary, they demonstrate some old techniques of web development, which can even be seen as bad practice nowadays.
Coding in the recommended style begins in part 1.
Use the Chrome browser now and all throughout the course.
Open the example application on your browser. Sometimes this takes a while.
The 1st rule of web development: Always keep the developer console open on your browser. With mac, the console can be opened by pressing alt cmd and i simultaneously. With windows the console opens by pressing F12 or ctrl shift and i simultaneously.
Before continuing, find out how to open the developer console on your computer (google if necessary) and remember to always keep it open when developing web applications.
The console looks as follows:
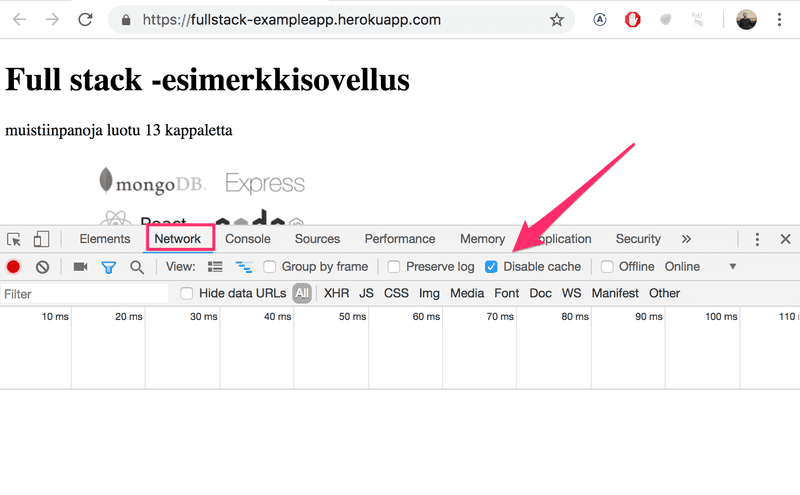
Ensure that the Network tab is open, and activate Disable cache as shown. Preserve log can also be useful. It saves the logs printed by the application when the page is reloaded.
NB: The most important tab is the Console. However, in the introduction we will be using the Network tab quite a bit.
HTTP GET
The server and the web browser communicate with each other using the HTTP protocol. The Network tab shows how the browser and the server communicate.
When you reload the page (press the F5 key or the ↺ symbol on your browser), the console shows that two events have happened:
- The browser fetches the contents of the page fullstack-exampleapp.herokuapp.com/ from the server
- And downloads the imagekuva.png
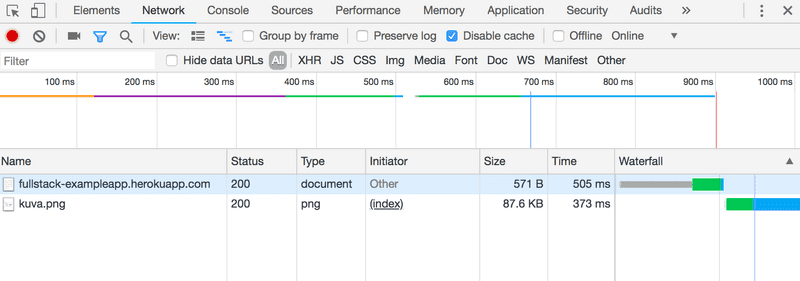
On a small screen you might have to widen the console window to see these.
Clicking the first event reveals more information on what's happening:

The upper part ,General, shows that the browser did a request to the address https://fullstack-exampleapp.herokuapp.com/ using the GET method, and that the request was successfull, because the server response had the Status code 200.
The request and the server response have serveral headers:
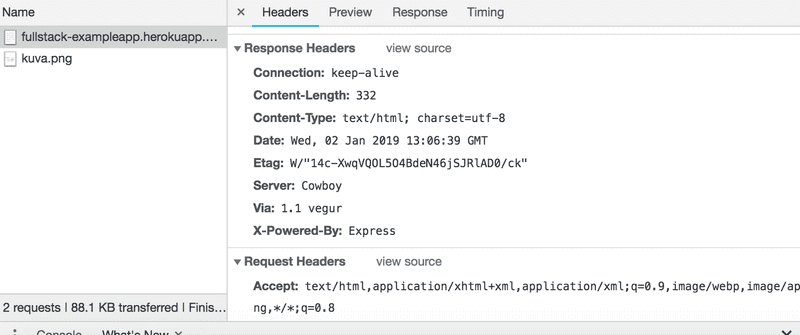
The Response headers on top tell us e.g the size of the response in bytes, and the exact time of the response. An important header Content-Type tells us that the response is a text file in utf-8-format, contents of which have been formatted with HTML. This way the browser knows the response to be a regular HTML-page, and to render it to the browser 'like a web page'.
Response tab shows the response data, a regular HTML-page. The body section determines the structure of the page rendered to the screen:
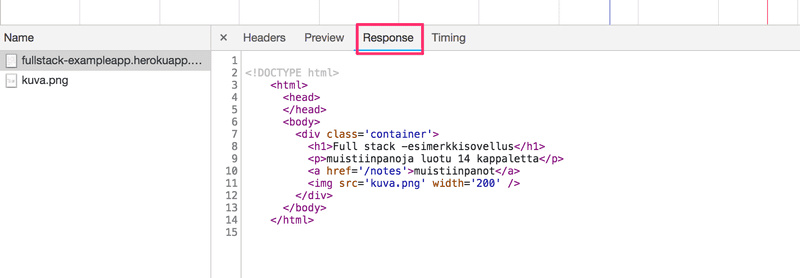
The page contains a div element, which in turn contains a header, a link to the page notes, and an img tag, and displays the amount of notes created.
Because of the img tag, the browser does a second HTTP-request to fetch the image kuva.png from the server. The details of the request are as follows:
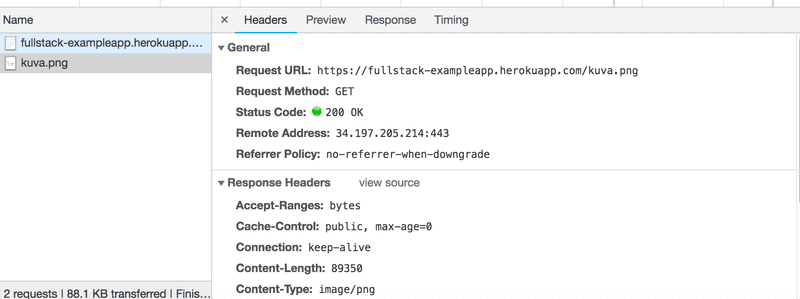
The request was made to the address https://fullstack-exampleapp.herokuapp.com/kuva.png and it's type is HTTP GET. The response headers tell us that the response size is 89350 bytes, and it's Content-type is image/png, so it is a png image. Browser uses this information to render the image correctly to the screen.
The chain of events caused by opening the page https://fullstack-exampleapp.herokuapp.com/ on a browser form the following sequence diagram
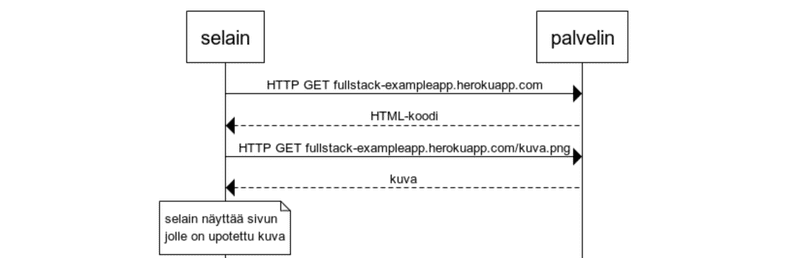
First, the browser does a HTTP GET request to the server to fetch the HTML code of the page. The img tag in the HTML prompts the browser to fetch the image kuva.png. The browser renders the HTML page and the image to the screen.
Even though it is difficult to notice, the HTML page begins to render before the image has been fetched from the server.
Traditional web applications
The homepage of the example application works like a traditional web application. When entering the page, browser fetches the HTML document detailing the structure and the textual content of the page from the server.
The server has formed this document somehow. The document can be a static text file saved into the server's directory. The server can also form the HTML documents dynamically according to the application code, using for example data from a database. The HTML code of the example application has been formed dynamically, because it contains information on the amount of created notes.
The HTML code of the homepage is as follows:
const getFrontPageHtml = noteCount => {
  return `
    <!DOCTYPE html>
    <html>
      <head>
      </head>
      <body>
        <div class="container">
          <h1>Full stack -esimerkkisovellus</h1>
          <p>muistiinpanoja luotu ${noteCount} kappaletta</p>
          <a href="/notes">muistiinpanot</a>
          <img src="kuva.png" width="200" />
        </div>
      </body>
    </html>
  `
}

app.get('/', (req, res) => {
  const page = getFrontPageHtml(notes.length)
  res.send(page)
})
You don't have to understand the code just yet.
The content of the HTML page has been saved as a template string, or a string which allows for evaluating, for example, variables in the midst of it. The dynamically changing part of the homepage, the amount of saved notes (in the code noteCount), is replaced by the current amount of notes (in the code notes.length) in the template string.
Writing HTML in the midst of the code is of course not smart, but for old-school PHP-programmers it was a normal practice.
In traditional web applications the browser is "dumb". It only fetches HTML data from the server, and all application logic is on the server. A server can be created for example using Java Spring like on the course Web-palvelinohjelmointi, Python Flask like on the course tietokantasovellus or Ruby on Railsilla. The example uses Express from Node.js. This course will use Node.js and Express to create web servers.
Running application logic on the browser
Keep the developer console open. Empty the console by clicking the ∅ symbol. Now when you go to the notes page, the browser does 4 HTTP requests:
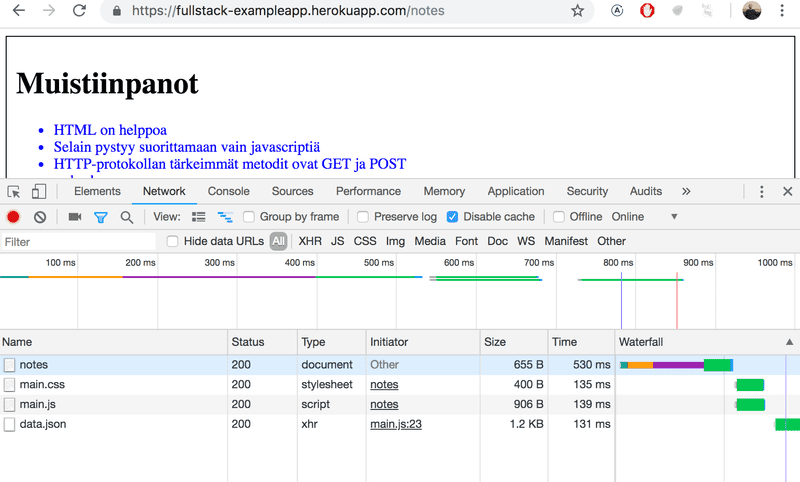
All of the requests have different types. The first request's type is document. It is the HTML code of the page, and it looks as follows:
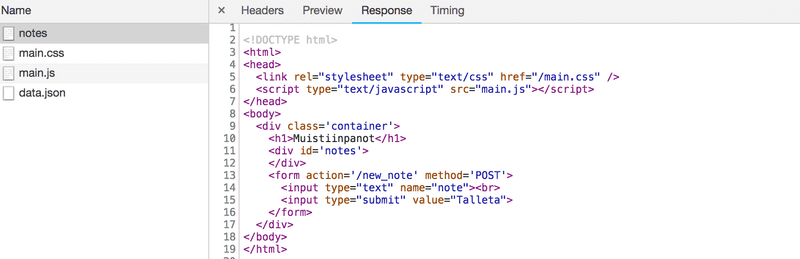
When we compare the page shown on the browser and the HTML code returned by the server, we notice that the code does not contain the list of notes. The head-section of the HTML contains a script-tag, which causes the browser to fetch a JavaScript file called main.js.
The JavaScript code looks as follows:
var xhttp = new XMLHttpRequest()

xhttp.onreadystatechange = function() {
  if (this.readyState == 4 && this.status == 200) {
    const data = JSON.parse(this.responseText)
    console.log(data)

    var ul = document.createElement('ul')
    ul.setAttribute('class', 'notes')

    data.forEach(function(note) {
      var li = document.createElement('li')

      ul.appendChild(li)
      li.appendChild(document.createTextNode(note.content))
    })

    document.getElementById('notes').appendChild(ul)
  }
)

xhttp.open('GET', '/data.json', true)
xhttp.send()
The details of the code are not important right now, but some code has been included to spice up the images and the text. We will properly start coding in part 1. The sample code in this part is actually not relevant at all to the coding techniques of this course.
Some might wonder why xhttp-object is used instead of the modern fetch. This is due to not wanting to go into promises at all yet, and the code having a secondary role in this part. We will return to modern ways to make requests to the server in part 2.
Immediately after fetching the script tag, the browser begins to execute the code.
The last two lines define that the the browser does a HTTP GET request to the servers address /data.json:
xhttp.open('GET', '/data.json', true)
xhttp.send()
This is the down-most request shown on the Network tab.
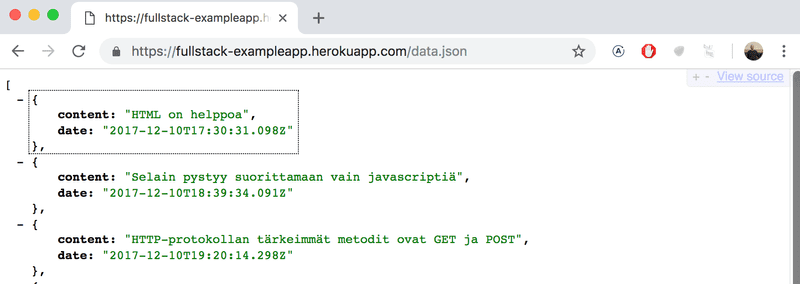
We can try going to the address https://fullstack-exampleapp.herokuapp.com/data.json straight from the browser:

There we find the notes in JSON "raw data". By default, the browser is not too good at displaying JSON-data. Plugins can be used to handle the formatting. Install for example JSONView to Chrome, and reload the page. The data is now much more nicely formatted.
So, the JavaScript code of the notes page above downloads the JSON-data containing the notes, and forms a bullet-point list from the note contents:
This is done by the following code:
const data = JSON.parse(this.responseText)
console.log(data)

var ul = document.createElement('ul')
ul.setAttribute('class', 'notes')

data.forEach(function(note) {
  var li = document.createElement('li')

  ul.appendChild(li)
  li.appendChild(document.createTextNode(note.content))
})

document.getElementById('notes').appendChild(ul)
The code first creates an unordered list with an ul-tag...
var ul = document.createElement('ul')
ul.setAttribute('class', 'notes')
...and then adds one li-tag for each note. Only the content field of each note becomes the contents of the li-tag. The timestamps found in the raw data are not used for anything here.
data.forEach(function(note) {
  var li = document.createElement('li')

  ul.appendChild(li)
  li.appendChild(document.createTextNode(note.content))
})
Now open the Console-tab on your developer console:

By clicking the little triangle at the beginning of the line, you can expand the text on the console.

This output on the console is caused by console.log command in the code:
const data = JSON.parse(this.responseText)
console.log(data)
So after receiving data from the server, the code prints it to the console.
The Console tab and the console.log command will become very familiar to you during the course.
Event handlers and Callback functions
The structure of the code is a bit odd:
var xhttp = new XMLHttpRequest()

xhttp.onreadystatechange = function() {
  // koodi, joka käsittelee palvelimen vastauksen
}

xhttp.open('GET', '/data.json', true)
xhttp.send()
The request to the server is sent on the last line, but the code to handle the response can be found further up. Whats going on?
On this line,
xhttp.onreadystatechange = function () {an event handler for event onreadystatechange is defined for the xhttp object doing the request. When the state of the object changes, the browser calls the event handler function. The function code checks that the readyState equals 4 (which depicts the situation The operation is complete ) and that the HTTP status code of the response is 200.
xhttp.onreadystatechange = function() {
  if (this.readyState == 4 && this.status == 200) {
    // koodi, joka käsittelee palvelimen vastauksen
  }
)
The mechanism of invoking event handlers is very common in JavaScript. Event handler functions are called callback functions. The application code does not invoke the functions itself, but the runtime environment - the browser, invokes the function at an appropriate time, when the event has occurred.
Document Object Model or DOM
We can think of HTML-pages as implicit tree structures.
html
  head
    link
    script
  body
    div
      h1
      div
        ul
          li
          li
          li
      form
        input
        input
The same treelike structure can be seen on the console tab Elements.
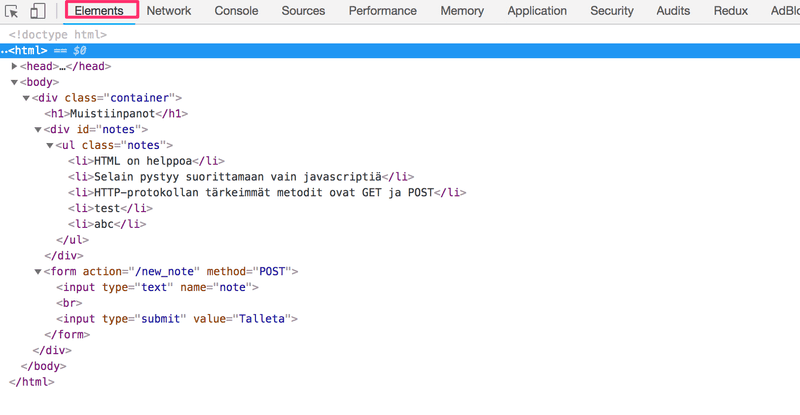
The functioning of the browser is based on the idea of depicting HTML elements as a tree.
Document Object Model, or DOM is an Application Programming Interface, (an API), which enables programmatic modification of the element trees corresponding to web-pages.
The JavaScript code introduced in the previous chapter used the DOM-API to add a list of notes to the page.
The following code creates a new node to the variable ul, and adds some child nodes to it:
var ul = document.createElement('ul')

data.forEach(function(note) {
  var li = document.createElement('li')

  ul.appendChild(li)
  li.appendChild(document.createTextNode(note.content))
})
Finally, the tree branch of the ul variable is connected to its proper place in the HTML tree of the whole page:
document.getElementById('notes').appendChild(ul)manipulating the document-object from console
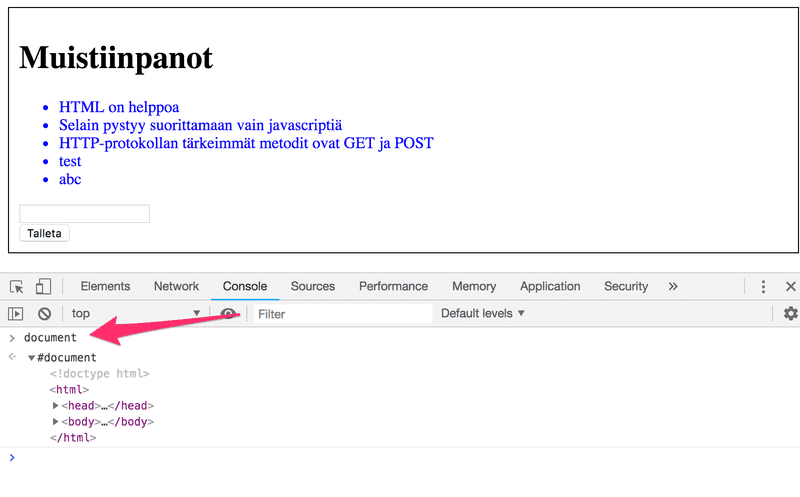
The topmost node of the DOM tree of a HTML document is called the document. You can access this object from the Console-tab:
We can perform various operations on a web-page using the DOM-API and utilizing the document object.
Let's add a new note to the page from the console.
First, we'll get the list of notes from the page. The list is in the first ul-element of the page:
lista = document.getElementsByTagName('ul')[0]Then create a new li-element and add some text content to it:
uusi = document.createElement('li')
uusi.textContent = 'Sivun manipulointi konsolista on helppoa'
And add the new li-element to the list:
lista.appendChild(uusi)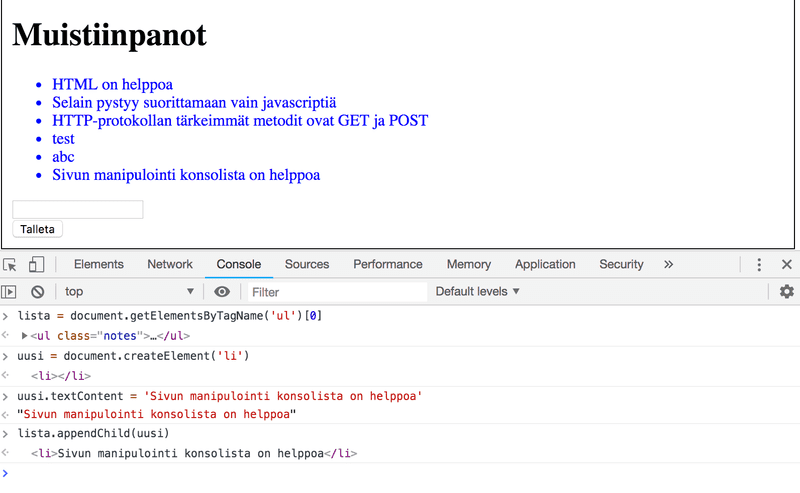
Even though the page updates on your browser, the changes are not permanent. If the page is reloaded, the new note will dissappear, because the changes were not pushed to the server. The JavaScript code the browser fetches will always create the list of notes based on JSON-data from address https://fullstack-exampleapp.herokuapp.com/data.json.
CSS
The head element of the HTML code of the Notes page contains a link tag, which determines that the browser must fetch a CSS style sheet from the address main.css.
Cascading Style Sheets, or CSS, is a markup language used to determine the appearance of web applications.
The fetched CSS-file looks as follows:
.container {
  padding: 10px;
  border: 1px solid;
}

.notes {
  color: blue;
}
The file defines two class selectors. These are used to select certain parts of the page and to define styling rules to style them.
A class selector definition always starts with a period, and contains the name of the class.
The classes are attributes, which can be added to HTML elements.
CSS attributes can be examined on the elements tab on the console:
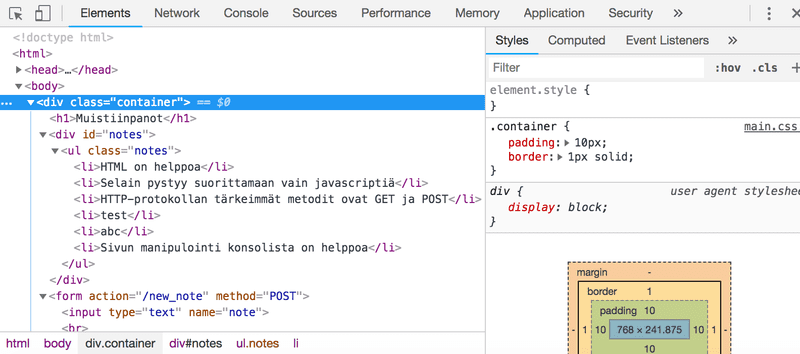
The outermost div element has the class container. The ul element containing the list of notes has the class notes.
The CSS rule defines, that element with the container class will be outlined with one pixel wide border. It also sets 10 pixel padding to the element. This sets some empty space between the element content and the border.
The second CSS rule sets the text color of the notes blue.
HTML elements can also have other attributes than classes. The div element containing the notes has an id attribute. JavaScript code uses the id to find the element.
The Elements tab of the console can be used to change the styles of the elements.
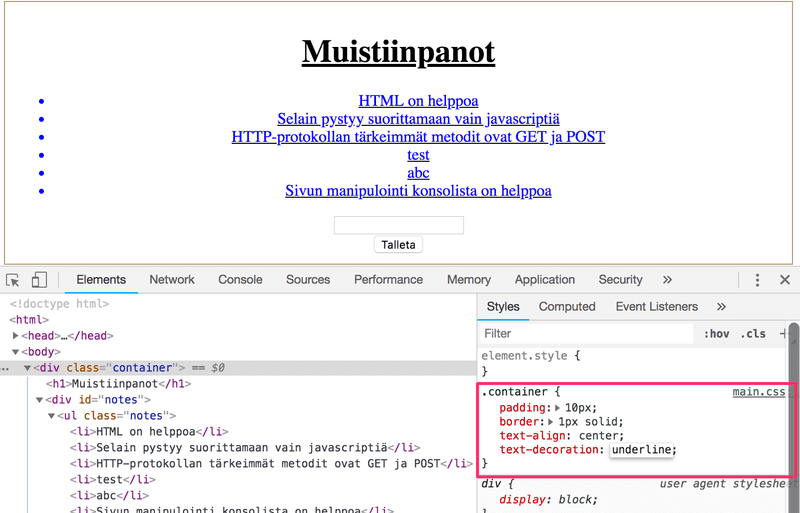
Changes made on the console will not be permanent. If you want to make lasting changes, they must be saved to the CSS style sheet on the server.
Loading a page containing JavaScript - revised
Let's revise what happens when the page https://fullstack-exampleapp.herokuapp.com/notes is opened on the browser.
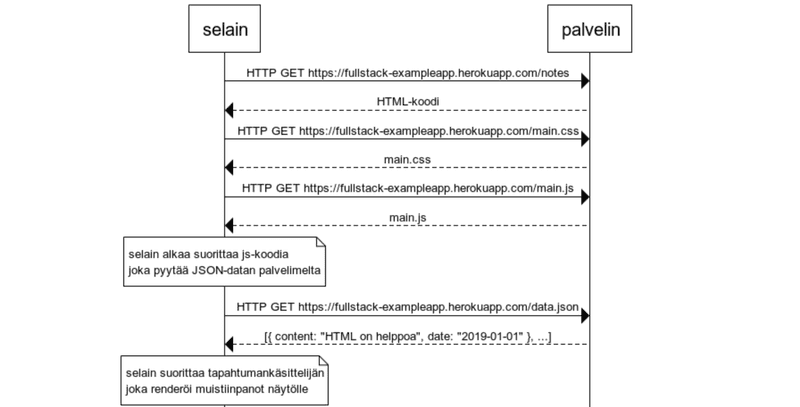
- The browser fetches the HTML code defining the content and the structure of the page from the server using a HTTP GET request.
- Links in the HTML code cause the browser to also fetch the CSS style sheet main.css...
- ...and a JavaScript code file main.js
- The browser executes the JavaScript code. The code makes a HTTP GET request to the address https://fullstack-exampleapp.herokuapp.com/data.json, which returns the notes as JSON data.
- When the data has been fetched, the browser executes an event handler, which renders the notes to the page using the DOM-API.
Forms and HTTP POST
Next let's examine how adding a new note is done.
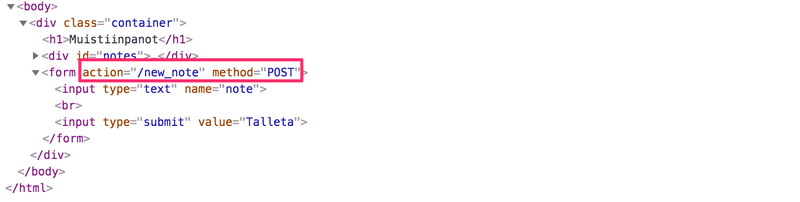
The Notes page contains a form-element

When the button on the form is clicked, the browser will send the user input to the server. Let's open the Network tab and see what submitting the form looks like:
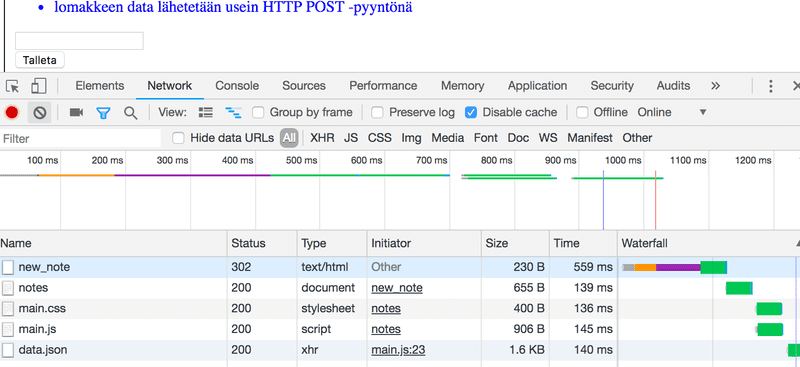
Surprisingly, submitting the form causes altogether five HTTP requests. The first one is the form submit event. Let's zoom into it:
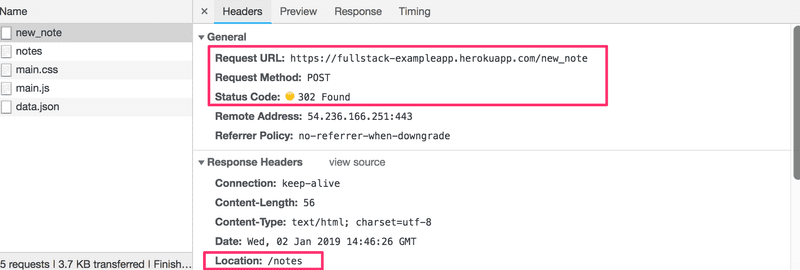
It is a HTTP POST request to the server address new_note. The server responds with HTTP status code 302. This is an URL redirect, with which the server asks the browser to do a new HTTP GET request to the address defined in the header's Location - the address notes.
So, the browser reloads the Notes page. The reload causes three more HTTP requests: fetching the style sheet (main.css), the JavaScript code (main.js) and the raw data of the notes (data.json).
The network tab also shows the data submitted with the form:
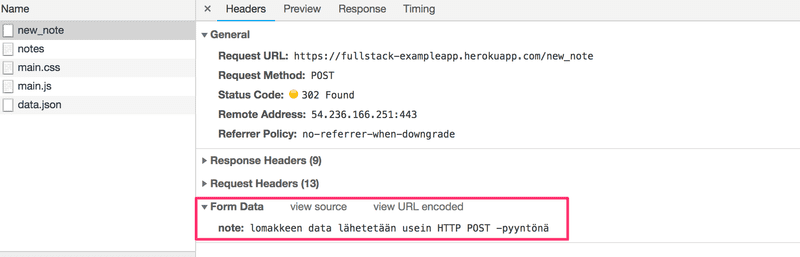
The Form tag has attributes action and method, which define that submitting the form is done as a HTTP POST request to the address new_note.
The code on the server responsible for the POST request is simple (NB: this code is on the server, and not on the JavaScript code fetched by the browser):
app.post('/new_note', (req, res) => {
  notes.push({
    content: req.body.note,
    date: new Date(),
  })

  return res.redirect('/notes')
})
Data is sent as the body of the POST-request.
The server can access the data by accessing the req.body field of the request object req.
The Server creates a new note object, and adds it to an array called notes.
notes.push({
  content: req.body.note,
  date: new Date(),
})
The Note objects have two fields: content containing the actual content of the note, and date containing the date and time the note was created. The server does not save new notes to a database, so new notes dissappear when Heroku restarts the service.
AJAX
The Notes page of the application follows the noughties style of web development and "uses Ajax", so it is on the forefront of web technology for the early 2000's.
AJAX (Asynchronous Javascript and XML) is a term which was launched in February 2005 to describe the new revolutionary way browser development enabled fetching new content to webpages using JavaScript included in the HTML without having to rerender the page.
Before the AJAX era, all web pages worked like the traditional web application we saw earlier in this chapter. All of the data shown on the page was fetched with the HTML-code generated by the server.
The Notes page uses AJAX to fetch the notes data. Submitting the form still uses the traditional mechanism of submitting web-forms.
The application URLs reflect the old, carefree times. JSON data is fetched from the url https://fullstack-exampleapp.herokuapp.com/data.json and new notes are sent to the url https://fullstack-exampleapp.herokuapp.com/new_note.
Nowadays urls like these would not be good at all, as they don't follow the generally acnowledged conventions of RESTful APIs, which we'll look into more in part 3
The thing called AJAX is now so commonplace it's taken for granted. The term has faded into oblivion, and the new generations have never even heard of it.
Single page app
In our example app, the home page works like a traditional web-page: All of the logic is on the server, and the browser only renders the HTML as instructed.
The Notes page gives some of the responsibility, generating the HTML code for existing notes, to the browser. The browser tackles this task by executing the JavaScript code it fetched from the server. The code fetches the notes from the server as JSON-data, and adds HTML elements for displaying the notes to the page using the DOM-API.
In recent years, the Single-page application (SPA) style of creating web-applications has emerged. SPA style websites don't fetch all of their pages separately from the server like our sample application does, but are composed of one HTML page fetched from the server, contents of which are manipulated with JavaScript running on the browser.
The Notes page of our application bears some resemblance to SPA-style apps, but it's not quite there yet. Even though the logic for rendering the notes is run on the browser, the page still uses the traditional way of adding new notes. The data is sent to the server with form submit, and the server instructs the browser to reload the Notes page with a redirect.
A single page app version of our example application can be found from https://fullstack-exampleapp.herokuapp.com/spa. At first glance, the application looks exactly the same as the previous one. The HTML code is almost identical, but the JavaScript file is different (spa.js) and there is a small change in the form-tag is defined:
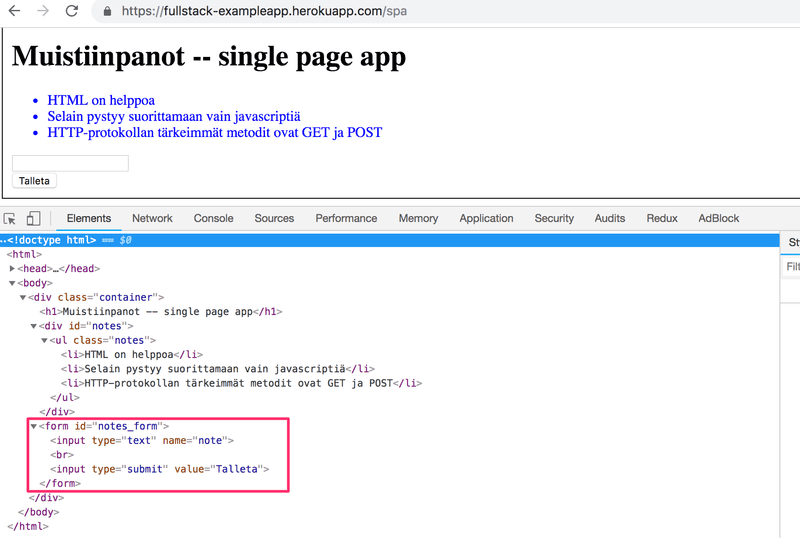
The form has no action or method attributes to define how and where to send the input data.
Open the Network-tab and empty it by clicking the ∅ symbol. When you now create a new note, you'll notice that the browser sends only one request to the server.
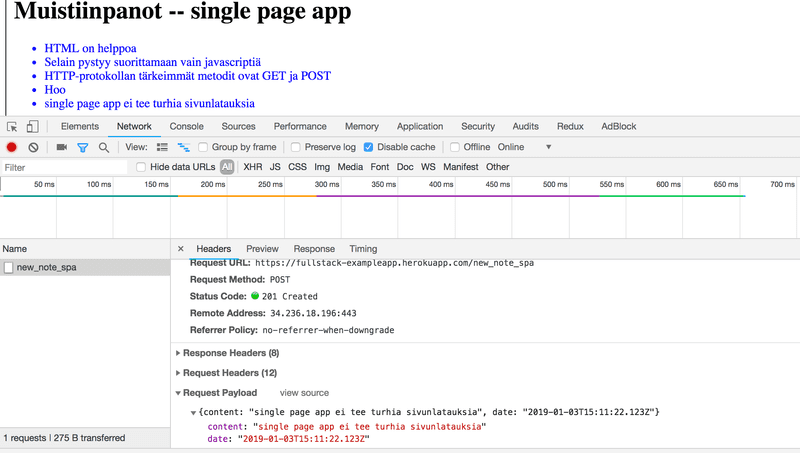
The POST request to the address new_note_spa contains the new note as JSON-data containing both the content of the note (content) and the timestamp (date):
{
  content: "single page app ei tee turhia sivunlatauksia",
  date: "2019-01-03T15:11:22.123Z"
}
The Content-Type header of the request tells the server, that the included data is represented in the JSON format.
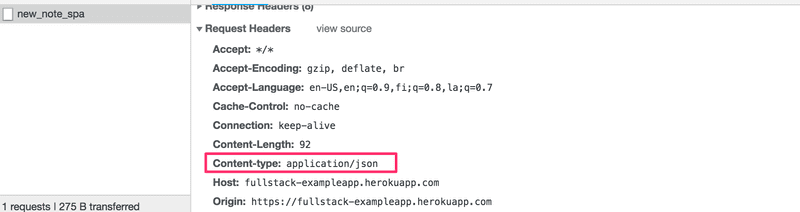
Without this header, the server would not know how to correctly parse the data.
The server responds with statuscode 201 created. This time the server does not ask for a redirect, the browser stays on the same page, and it sends no further HTTP-requests.
The SPA version of the app does not send the form data the traditional way, but instead uses the JavaScript code it fetched from the server. We'll look into this code a bit, even though understanding all the details of it is not important just yet.
var form = document.getElementById('notes_form')
form.onsubmit = function(e) {
  e.preventDefault()

  var note = {
    content: e.target.elements[0].value,
    date: new Date(),
  )

  notes.push(note)
  e.target.elements[0].value = ''
  redrawNotes()
  sendToServer(note)
)
The command document.getElementById('notes_form') instructs the code to fetch the form-element from the page, and to register an event handler to handle the form submit event. The event handler immediately calls the method e.preventDefault() to prevent the default handling of form submit. The default method would send the data to server and cause a redirect, which we don't want to happen.
Then the event handler creates a new note, adds it to the notes list with the command notes.push(note), rerenders the note list on the page and sends the new note to the server.
The code for sending the note to the server is as follows:
var sendToServer = function(note) {
  var xhttpForPost = new XMLHttpRequest()
  // ...

  xhttpForPost.open('POST', '/new_note_spa', true)
  xhttpForPost.setRequestHeader(
    'Content-type', 'application/json'
  )
  xhttpForPost.send(JSON.stringify(note))
)
The code determines, that the data is to be send with a HTTP POST request and the data type is to be JSON. The data type is determined with a Content-type header. Then the data is sent as JSON-string.
The application code is available at https://github.com/mluukkai/example_app. It's worth to remember, that the application is only ment to demonstrate the concepts of the course. The code is partially bad style, and should not be used as an example when coding your own applications. The same is true for the URLs used. The URL new_note_spa new notes are sent to does not follow the current best practices.
Javascript-libraries
The sample app is done with so called vanilla Javascript using only the DOM-API and JavaScript to manipulate the structure of the pages.
Instead of using just JavaScript and the DOM-API, different libraries containing easier to use tools than the DOM-API are often used to manipulate pages. One of these libraries is the ever-so-popular JQuery.
JQuery was developed back when web-pages mainly followed the traditional style of the server generating HTML pages, functionality of which was enhanced on the browser using JavaScript written with JQuery. One of the reasons for the success of JQuery was so called cross-browser compatibility. The library worked regardless of the browser or the company who made it, so there was no need for browser specific solutions. Nowadays using JQuery is not as justified, as VanillaJS has advanced a lot, and the most popular browsers generally support basic functionalities well.
The rise of the single page app brought serveral more "modern" ways of web development than JQuery. The favourite of the first wave of developers was BackboneJS. After it's launch (https://github.com/angular/angular.js/blob/master/CHANGELOG.md#100-temporal-domination-2012-06-13) in 2012 Googles AngularJS quicly became almost the de facto standard of modern web development.
However, the popularity of Angular plummeted after the Angluar team announced in October 2014 that support for version 1 will end, and Angular 2 will not be backwards compatible with the first version. Angular 2 and the newer versions have not gotten too warm of a welcome.
Currently the most popular tool for implementing the browser side logic of web-applications is Facebook's React-library. During this course, we will get familiar with React and the Redux-library, which are frequently used together.
The status of React seems strong, but the world of JavaScript is ever changing. Recently for example a newcomer VueJS has been capturing some interest.
Full stack -web development
What does the name of the course, Full stack web development, mean? Full stack is a buzzword, and everyone talks about it while no one really knows what it actually means. Or at least no agreed upon definition exists for the term.
Practically all web applications have (at least) two "layers": the browser at the top layer, being closer to the end user, and the server at the bottom layer. Often there is also a database layer below the server. We can therefore think of the architecture of a web application as a kind of a stack of layers.
Often we also talk about the frontend and the backend. The browser is the frontend, and JavaScript run on the browser is frontend code. The server on the other hand is the backend.
In the context of this course, full stack web development means that we focus on all parts of the application: the frontend, the backend and the database. Sometimes the software on the server and its operating system are seen as parts of the stack, but we won't go into those.
We will code the backend with JavaScript, using Node.js runtime environment. Using the same programming language on multiple layers of the stack gives full stack web development a whole new dimension. However it's not a requirement of full stack web development to use the same programming language (JavaScript) for all layers of the stack.
It used to be more common for developers to specialize in one layer of the stack, for example the backend. Technologies on the backend and the frontend were quite different. With the Full stack trend, it has become common for developers to be proficient on all layers of the application and the database. Oftentimes, full stack developers must also have enough configuration and administration skills to operate their application for example in the cloud.
Javascript fatigue
Full stack web development is challenging in many ways. Things are happening in many places at once, and debugging is quite a bit harder than with regular desktop applications. JavaScript does not always work like you'd expect it to (compared to many other languages) and the asynchronous way its runtime environments work causes all sorts of challenges. Communicating in the web requires knowledge of the HTTP-protocol. One must also handle databases and server administration and configuration. It would also be good to know enough CSS to make applications at least somewhat presentable.
The world of JavaScript develops fast, which brings its own set of challenges. Tools, libraries and the language itself are under constant development. Some are starting to get tired of the constant changes, and have launched to term for it: Javascript fatigue.
You will catch the JavaScript fatigue during this course. Lucky for us, there are a few ways to lower the learning curve, and we can start with coding instead of configuration. We can't avoid configuration completely, but the next few weeks we can merrily push ahead avoiding the worst of the configuration hells.

