c
Component state, event handlers
Let's go back to working with React.
We left our application in the following state:
const Hello = (props) => {
  return (
    <div>
      <p>
        Hello {props.name}, you are {props.age} years old
      </p>
    </div>
  )
}

const App = () => {
  const nimi = 'Pekka'
  const ika = 10

  return (
    <div>
      <h1>Greetings</h1>
      <Hello name="Arto" age={26 + 10} />
      <Hello name={nimi} age={ika} />
    </div>
  )
}
Component helper functions
Let's expand our Hello component so that it guesses the age of the person being greeted:
const Hello = (props) => {
  const bornYear = () => {    const yearNow = new Date().getFullYear()    return yearNow - props.age  }
  return (
    <div>
      <p>
        Hello {props.name}, you are {props.age} years old
      </p>
      <p>So you were probably born {bornYear()}</p>    </div>
  )
}
The logic for guessing the year of birth is separated into its own function that is called when the component is rendered.
The person's age does not have to passed as a parameter to the function since it can directly access all of the props that are passed to the component.
If we examine our current code closely, we'll notice that the helper function is actually defined inside of another function that defines the behavior of our component. In Java-programming defining a method inside of another method is not possible, but in JavaScript defining functions within functions is a commonly used technique.
Destructuring
Before we move onward, we will take a look at a small but useful feature of the JavaScript language that was added in the ES6 specification, that allows us to destructure values from objects and arrays upon assignment.
In our previous code we had to reference the data passed to our component as props.name and props.age. Out of these two expressions we had to repeat props.age twice in our code.
Since props is an object
props = {
  name: 'Arto Hellas',
  age: 35,
}
we can streamline our component by assigning the values of the properties directly into two variables name and age which we can then use in our code:
const Hello = (props) => {
  const name = props.name  const age = props.age
  const bornYear = () => new Date().getFullYear() - age

  return (
    <div>
      <p>Hello {name}, you are {age} years old</p>
      <p>So you were probably born {bornYear()}</p>
    </div>
  )
}
Note that we've also utilized the more compact syntax for arrow functions when defining the bornYear function. As mentioned earlier, if an arrow function consists of a single command then the function body does not need to be written inside of curly braces. In this more compact form the function simply returns the result of the single command.
To recap, the two function definitions shown below are equivalent:
const bornYear = () => new Date().getFullYear() - age

const bornYear = () => {
  return new Date().getFullYear() - age
}
Destructuring makes the assignment of variables even easier, since we can use it to extract and gather the values of an object's properties into separate variables:
const Hello = (props) => {
  const { name, age } = props  const bornYear = () => new Date().getFullYear() - age

  return (
    <div>
      <p>Hello {name}, you are {age} years old</p>
      <p>So you were probably born {bornYear()}</p>
    </div>
  )
}
If the object we are destructuring has the values
props = {
  name: 'Arto Hellas',
  age: 35,
}
the expression const { name, age } = props assigns the values 'Arto Hellas' to name and 35 to age.
We can take destructuring a step further:
const Hello = ({ name, age }) => {  const bornYear = () => new Date().getFullYear() - age

  return (
    <div>
      <p>
        Hello {name}, you are {age} years old
      </p>
      <p>So you were probably born {bornYear()}</p>
    </div>
  )
}
The props that are passed to the component are now directly destructured into the variables name and age.
This means that instead of assigning the entire props object into a variable called props and then assigning its properties into the variables name and age
const Hello = (props) => {
  const { name, age } = props
we assign the values of the properties directly to variables by destructuring the props object that is passed to the component function as a parameter:
const Hello = ({ name, age }) => {Page re-rendering
So far all of our applications have been such that their appearance remains the same after the initial rendering. What if we wanted to create a counter where the value increased as a function of time or after clicking a button?
Let's start with the following body:
const App = (props) => {
  const {counter} = props
  return (
    <div>{counter}</div>
  )
}

let counter = 1

ReactDOM.render(
  <App counter={counter} />,
  document.getElementById('root')
)
The root component is given the value of the counter in the counter prop. The root component renders the value to the screen. But what happens when the value of counter changes? Even if we were to add the command
counter.value += 1the component won't re-render. We can get the component to re-render by calling the ReactDOM.render method a second time, e.g. in the following way
const App = (props) => {
  const { counter } = props
  return (
    <div>{counter}</div>
  )
}

let counter = 1

const refresh = () => {
  ReactDOM.render(<App counter={counter} />,
  document.getElementById('root'))
}

refresh()
counter += 1
refresh()
counter += 1
refresh()
The re-rendering command has been wrapped inside of the refresh function to cut down on the amount of copy-pasted code.
Now the component renders three times, first with the value 1, then 2 and finally 3. However, the values 1 and 2 are displayed on the screen for such a short amount of time that they can't even be witnessed.
We can implement slightly more interesting functionality by re-rendering and incrementing the counter every second by using setInterval:
setInterval(() => {
  refresh()
  counter += 1
}, 1000)
Making repeated calls to the ReactDOM.render-method is not the recommended way to re-render components. Next, we'll introduce ourselves to a better way of accomplishing this effect.
Stateful component
All of our components up till now have been simple in the sense that they have not contained any state that could change during the lifecycle of the component.
Next, let's add state to our application's App component with the help of React's state hook.
We will change the application to the following
import React, { useState } from 'react'import ReactDOM from 'react-dom'

const App = (props) => {
  const [ counter, setCounter ] = useState(0)
  setTimeout(    () => setCounter(counter + 1),    1000  )
  return (
    <div>{counter}</div>
  )
}

ReactDOM.render(
  <App />,
  document.getElementById('root')
)
In the first row, the application imports the useState-function:
import React, { useState } from 'react'The function body that defines the component begins with the function call
const [ counter, setCounter ] = useState(0)The function call adds state to the component that gets the initial value of zero. The functio returns an array that contains two items. We assign the items to the variables counter and setCounter by using the destructuring assignment syntax shown earlier.
The counter variable is assigned the value of the current state which is zero initially. The variable setCounter is assigned to a function that can be used to modify the state.
The application uses the setTimeout function to increment the counter state after a second has gone by:
setTimeout(
  () => setCounter(counter + 1),
  1000
)
When the state modifying function setCounter is called React re-renders the component, which means that the function body of the component function gets re-executed:
(props) => {
  const [ counter, setCounter ] = useState(0)

  setTimeout(
    () => setCounter(counter + 1),
    1000
  )

  return (
    <div>{counter}</div>
  )
}
When the component function gets executed a second time, calling the useState function returns the already-existing current value of the state which is now 1. Executing the function body again also makes the function call to setState which will increment the counter state after a second has gone by. Finally the current value of the counter is rendered on the screen, which is currently 1.
The function passed as the first parameter to the setTimeout function will get invoked one second after calling the setTimeout function
() => setCounter(counter + 1)and because the value of the counter variable is 1, the code is essentially the same as a command setting the state counter value to 2
() => setCounter(2)This again causes the component to re-render. The value of the state will be incremented again after one second, and this will continue to repeat for as long as the application is running.
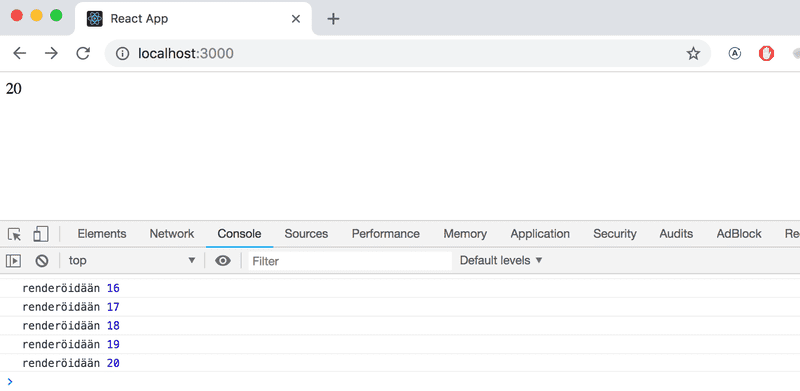
If the component doesn't render when you think it should, or if it renders at the "wrong time", you can debug the application by logging the values of the component's variables to the console. If we make the following additions to our code
const App = (props) => {
  const [ counter, setCounter ] = useState(0)

  setTimeout(
    () => setCounter(counter + 1),
    1000
  )

  console.log('renderöidään', counter)
  return (
    <div>{counter}</div>
  )
}
it's easy to follow and track the calls made to the render function:
When React stops working...
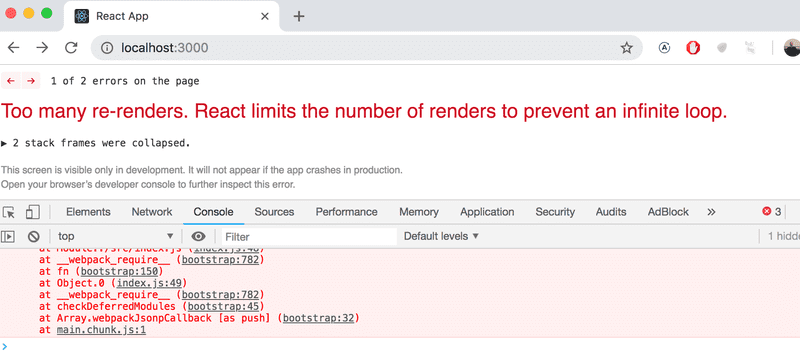
When you take the useState hook into use, you may run into the following error message:

The reason for this is that you have not installed a new enough version of React, as was instructed at the beginning of part 1.
rm -rf node_modules/ && npm iEvent handling
We have already mentioned event handlers a few times in part 0, that are registered to be called when specific events occur. E.g. a user's interaction with the different elements of a web page can cause a collection of various different kind of events to be triggered.
Let's change the application so that increasing the counter happens when a user clicks on a button implemented with the button-element.
Button-elements support so-called mouse events, out of which click is the most common event.
In React registering an event handler function to the click event happens like this:
const App = (props) => {
  const [ counter, setCounter ] = useState(0)

  const handleClick = () => {    console.log('klicked')  }
  return (
    <div>
      <div>{counter}</div>
      <button onClick={handleClick}>        plus      </button>    </div>
  )
}
We set the value of the button's onClick-attribute to be a reference to the handleClick function defined in the code.
Now every click of the plus button causes the handleClick function to be called, meaning that every click event will log a clicked message to the browser console.
The event handler function can also be defined directly in the value assignment of the onClick-attribute:
const App = (props) => {
  const [ counter, setCounter ] = useState(0)

  return (
    <div>
      <div>{counter}</div>
      <button onClick={() => console.log('klicked')}>        plus
      </button>
    </div>
  )
}
By changing the event handler to the following form
<button onClick={() => setCounter(counter + 1)}>
  plus
</button>
we achieve the desired behavior, meaning that the value of counter is increased by one and the component gets re-rendered.
Let's also add a button for resetting the counter:
const App = (props) => {
  const [ counter, setCounter ] = useState(0)

  return (
    <div>
      <div>{counter}</div>
      <button onClick={() => setCounter(counter + 1)}>
        plus
      </button>
      <button onClick={() => setCounter(0)}>         zero      </button>    </div>
  )
}
Our application is now ready!
Defining event handlers directly inside JSX-templates is often not a wise move. Let's extract the event handler functions into the their own separate helper functions:
const App = (props) => {
  const [ counter, setCounter ] = useState(0)

  const increaseByOne = () =>    setCounter(counter + 1)    const setToZero = () =>    setCounter(0)
  return (
    <div>
      <div>{counter}</div>
      <button onClick={increaseByOne}>        plus
      </button>
      <button onClick={setToZero}>        zero
      </button>
    </div>
  )
}
Event handlers are functions
The functions increaseByOne and setToZero work almost exactly the same way, they just set a new value for the counter. Let's write a new function that serves both cases.
const App = (props) => {
  const [ counter, setCounter ] = useState(0)

  const setToValue = (value) => setCounter(value)
  return (
    <div>
      <div>{counter}</div>
      <button onClick={setToValue(counter + 1)}>        plus
      </button>
      <button onClick={setToValue(0)}>        zero
      </button>
    </div>
  )
}
We realize that this change breaks our application entirely:
What's causing the application to break? The event handler is supposed to define a reference to a function. However, in our code we've defined
<button onClick={setToValue(0)}>meaning that the event handler is actually a function call, not a reference to the function. As a general rule there is nothing wrong with this, but in this particular case the setToValue(0) function is called when React renders the component. This function then makes a call to the setCounter function, which in turn causes the component to be re-rendered. And this cycle goes on and one...
There's two potential solutions to this problem. The simpler solution is to change the event handlers into the form shown below
const App = (props) => {
  const [ counter, setCounter ] = useState(0)

  const setToValue = (value) => setCounter(value)

  return (
    <div>
      <div>{counter}</div>
      <button onClick={() => setToValue(counter + 1)}>        plus
      </button>
      <button onClick={() => setToValue(0)}>        zero
      </button>
    </div>
  )
}
The event hander is now a function that calls the setToValue function with the appropriate parameter:
<button onClick={() => setToValue(counter + 1)}>Function that returns a function
The other solution is to use a common trick often seen in JavaScript and functional programming at large. The trick is to define a function that returns a function:
const App = (props) => {
  const [ counter, setCounter ] = useState(0)

  const setToValue = (value) => {    return () => {      setCounter(value)    }  }
  return (
    <div>
      <div>{counter}</div>
      <button onClick={setToValue(counter + 1)}>        plus
      </button>
      <button onClick={setToValue(0)}>        zero
      </button>
    </div>
  )
}
Getting comfortable with this technique may take some time if this is your first time using it.
We have defined the following setToValue event handler function:
const setToValue = (value) => {
  return () => {
    setCounter(value)
  }
}
Defining the event handler by calling setToValue(0) results in the function
() => {
  setCounter(0)
}
which is exactly the desired function for resetting the state!
The event handler for the plus-button is defined by calling setToValue(counter + 1). When the component is rendered for the first time, the counter will have the initial value 0, meaning that the event handler for the plus-button will be the result of setToValue(1):
() => {
  setCounter(1)
}
Likewise, when the state of the counter is 41 the event handler for the plus-button will be
() => {
  setCounter(42)
}
Let's take a closer look at the setToValue function:
const setToValue = (value) => {
  return () => {
    setCounter(value)
  }
}
Because the function body only contains a single command, we can once again utilize the more compact arrow function syntax:
const setToValue = (value) => () => {
  setCounter(value)
}
In these situations it's common to write everything onto one line, resulting in a "double arrow" function:
const setToValue = (value) => () => setCounter(value)Double arrow functions can be thought of as functions that have to be called twice in order to get the final result.
The first function call is used to "configure" the second function, by defining some of its parameters. By calling setToValue(5) we assign the value 5 to value and we're left with the following function:
() => setCounter(5)This way of utilizing functions that return functions is effectively the same thing as currying in functional programming. The term currying does not originate from functional programming, rather the term is deeply rooted in mathematics.
We've mentioned functional programming a few times now, which may not be familiar to everyone. We will explore some aspects of functional programming throughout the course, as React supports and partially requires the use of some of the styles of functional programming:
NB the change where we replaced the functions increaseByOne and setToZero with the function setToValue is not necessarily an improvement, since specialized function have more descriptive names. The reason we made the change was mostly to demonstrate the usage of the currying-technique.
NB You don't necessarily need to use functions that return functions in any of the exercises, so don't worry too much about understanding this technique if the topic seems too confusing.
Passing state to child components
It's recommended to write React components that are small and reusable across the application and even across projects. Let's refactor our application so that it's composed of three smaller components, one component for displaying the counter and two components for buttons.
Let's first implement a Display component that's responsible for displaying the value of the counter.
One best practice in React is to lift the state up as high up as possible in the component hierarchy, preferably to the App root component.
Let's place the application's state in the App component and pass it down to the Display component through props:
const Display = (props) => {
  return (
    <div>{props.counter}</div>
  )
}
We can also utilize destructuring directly in the component function's parameters. Since we're interested in the counter property of the props object, it's possible to simplify the component into the following form:
const Display = ({ counter }) => {
  return (
    <div>{counter}</div>
  )
}
Since the component function only consists of a single command we can also use the compact syntax for arrow functions:
const Display = ({ counter }) => <div>{counter}</div>Using the component is straightforward, as we only need to pass the state of the counter to component:
const App = (props) => {
  const [counter, setCounter] = useState(0)
  const setToValue = (value) => setCounter(value)

  return (
    <div>
      <Display counter={counter}/>      <button onClick={() => setToValue(counter + 1)}>
        plus
      </button>
      <button onClick={() => setToValue(0)}>
        zero
      </button>
    </div>
  )
}
Everything still works. When the buttons are clicked and the App gets re-rendered, all of its children including the Display component are also re-rendered.
Next, let's make a Button component for the buttons of our application. We have to pass the event handler as well as the title of the button through the component's props:
const Button = (props) => (
  <button onClick={props.handleClick}>
    {props.text}
  </button>
)
and let's utilize destructuring again to unpack and assign the needed properties from the props object to variables:
const Button = ({ handleClick, text }) => (
  <button onClick={handleClick}>
    {text}
  </button>
)
Our App component now looks like this:
const App = (props) => {
  const [ counter, setCounter ] = useState(0)
  const setToValue = (value) => setCounter(value)


  return (
    <div>
      <Display counter={counter}/>
      <Button        handleClick={() => setToValue(counter + 1)}        text='plus'      />      <Button        handleClick={() => setToValue(counter - 1)}        text='minus'      />      <Button        handleClick={() => setToValue(0)}        text='zero'      />    </div>
  )
}
Since we now have an easily reusable Button component, we've also implemented new functionality into our application by adding a button that can be used to decrement the counter.
The event handler is passed to the Button component through the handleClick prop. The name of the prop itself is not that significant, but our naming choice wasn't completely random, e.g. React's own official tutorial suggests this convention.

