c
Getting data from server
For a while now we have only worked on the "frontend", aka the functionality in the browser. We will begin working on the "backend", aka the server side functionality, in the third part of this course. Nonetheless, we will take a step in that direction by getting familiar with how the code in the browser communicates with the backend.
Let's use a tool called JSON Server, which is meant to be used during software development, to act as our server.
Make a file db.json into the root directory of the project with the following content:
{
  "notes": [
    {
      "id": 1,
      "content": "HTML on helppoa",
      "date": "2019-01-10T17:30:31.098Z",
      "important": true
    },
    {
      "id": 2,
      "content": "Selain pystyy suorittamaan vain javascriptiä",
      "date": "2019-01-10T18:39:34.091Z",
      "important": false
    },
    {
      "id": 3,
      "content": "HTTP-protokollan tärkeimmät metodit ovat GET ja POST",
      "date": "2019-01-10T19:20:14.298Z",
      "important": true
    }
  ]
}
You can install JSON server so-called globally on your machine using the command npm install -g json-server. A global installation requires administrative privileges, which means it is not possible on the faculty computers or freshman laptops.
However, a global installation is not necessary, since we can run the json-server using the command npx:
npx json-server --port=3001 --watch db.jsonBy default json-server starts running on port 3000, but because projects created using create-react-app reserve port 3000 we must define an alternate port, e.g. 3001, for json-server.
In the browser let's navigate to the address http://localhost:3001/notes. We can see that json-server serves the notes we previously wrote to the file in the JSON format:
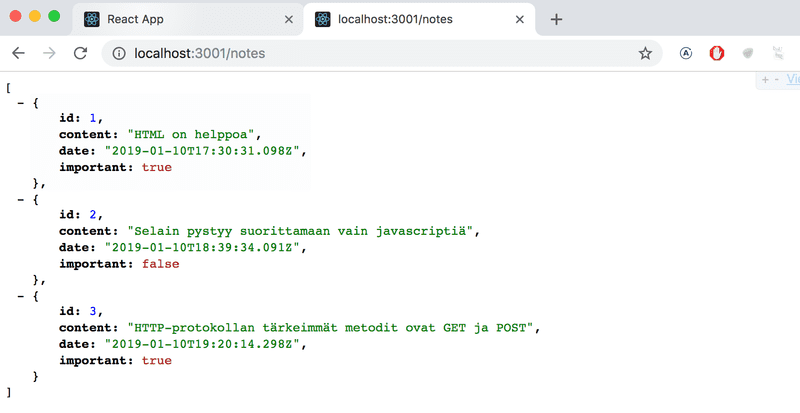
If your browser doesn't have a way to format the display of JSON-data, then install an appropriate plugin, e.g. JSONView to make your life easier.
The idea, going forward, is to save the notes to the server, which in this case means saving to json-server. The React code fetches the notes from the server and renders them to the screen. When a new note is added to the application the React code also sends it to the server to make the new note persistent in "memory".
json-server stores all the data into the file db.json, which resides on the server. In the real world data will be stored into some kind of database. However, json-server is a handy tool, which facilitates the usage of server side functionality in the development phase without needing to program anything.
We will get familiar with the principles of implementing server side functionality in more detail in part 3 of this course.
The browser as a runtime environment
Our first task is fetching the already existing notes to our React application from the address http://localhost:3001/notes.
In the the project example from part 0 we already encountered a way to data from a server using Javascript. The code in the example was fetching the data using XMLHttpRequest, otherwise known as a HTTP request made using a XHR object. This is a technique launched in the year 1999, which every browser has supported for a good while.
Nowadays it is not recommended to use XHR and browsers already widely support the fetch method, which is based on so-called promises, instead of the event driven model used by XHR.
The following is a refresh of how data was fetched using XHR, mentioned in part 0 (which one should actually remember to not use without a good reason)
const xhttp = new XMLHttpRequest()

xhttp.onreadystatechange = function() {
  if (this.readyState == 4 && this.status == 200) {
    const data = JSON.parse(this.responseText)
    // käsittele muuttujaan data sijoitettu kyselyn tulos
  }
}

xhttp.open('GET', '/data.json', true)
xhttp.send()
Right at the beginning we register an event handler to the xhttp object, which represents the HTTP request, and will be called by the Javascript runtime when the state of the xhttp object changes. If the change in state means that the response to the request has arrived, then the data is handled accordingly.
It is notable that the code in the event handler is defined before the request is sent to the server. Despite this the code within the event handler will be executed at a later point in time. Therefore the code does not execute synchronously "from top to bottom", but does so asynchronously. Javascript calls the event handler that was registered for the request at some point.
The way of doing requests synchronously, familiar from e.g. Java programming, would play out as follows (NB this is not actually working Java code):
HTTPRequest request = new HTTPRequest();

String url = "https://fullstack-exampleapp.herokuapp.com/data.json";
List<Muistiinpano> muistiinpanot = request.get(url);

muistiinpanot.forEach(m => {
  System.out.println(m.content);
})
In Java the code executes line by line and stops to wait for the HTTP request, which means waiting for the command request.get(...) to finish. The data returned by the command, the notes, are then stored in a variable and we start manipulation the data in the as we want.
On the other hand Javascript engines, or runtime environments, follow the asynchronous model, behind which is a principle, according to which all IO-operations (with some exceptions) are executed as non-blocking, meaning not waiting and immediately resuming code execution.
When operations are completed, or more specifically at some point after completion, the Javascript engine calls the event handlers registered to the operation.
Currently Javascript engines are single threaded, meaning they cannot execute code in parallel. Due to this fact, it is practically a requirement to use a non-blocking model for executing IO operations. Otherwise the browser would "freeze" for the duration of e.g. fetching data from a server.
Another consequence of the single threaded nature of Javascript engines is that if some code execution takes up a lot of time the browser will be stuck for the duration of the execution. If we add the following code at the top of our application:
setTimeout(() => {
  console.log('loop..')
  let i = 0
  while (i < 50000000000) {
    i++
  }
  console.log('end')
}, 5000)
Everything works normally for 5 seconds. When the function defined as the parameter for setTimeout is run the browser is stuck for the duration of the execution of the long loop. At least in Chrome, the browser tab cannot even be closed during the execution of the loop.
For the browser to remain responsive, which would include continuously reacting to operations desired by the user in a timely manner, the code logic needs to be such that an individual computation cannot take too long.
There is a bunch of extra material about this topic on the internet. One particularly clear presentation of the topic is the keynote by Philip Roberts called What the heck is the event loop anyway?
In today's browsers it is possible to run parallelized code with the help of so-called web workers. The event loop of an individual browser window is, however, still only handled by a single thread.
npm
Let's get back to the topic of fetching data from the server.
We could use the previously mentioned promise based function fetch to pull the data from the server. Fetch is a great tool. It is standardized and supported by all modern browsers (excluding IE).
Having said that, for the communication between the browser and server we will instead be using the axios library, which functions like fetch, but is a bit more pleasant to use. Another good reason for the use of axios is us getting familiar with adding external libraries, so-called npm packages, to React projects.
Nowadays practically all Javascript projects are defined using the node package manager, aka npm. The projects created using create-react-app also follow the npm format. A strong sign that a project uses npm is the file package.json at the root of the project:
{
  "name": "notes",
  "version": "0.1.0",
  "private": true,
  "dependencies": {
    "react": "^16.8.0",
    "react-dom": "^16.8.0",
    "react-scripts": "2.1.3"
  },
  "scripts": {
    "start": "react-scripts start",
    "build": "react-scripts build",
    "test": "react-scripts test",
    "eject": "react-scripts eject"
  },
  "eslintConfig": {
    "extends": "react-app"
  },
  "browserslist": [
    ">0.2%",
    "not dead",
    "not ie <= 11",
    "not op_mini all"
  ]
}
At this point the dependencies part is most interesting to us, because it defines what dependencies, or external libraries, the project has.
Now we want to use axios. We define the library directly into the file package.json, but it is better to install it from the command line.
npm install axios --saveNB npm-commands should always be run in the project root directory, which is where the package.json file can be found.
Axios is now included among the other dependencies:
{
  "dependencies": {
    "axios": "^0.18.0",    "json-server": "^0.14.2",
    "react": "^16.8.0",
    "react-dom": "^16.8.0",
    "react-scripts": "2.1.3"
  },
  // ...
}
In addition to adding axios to the dependencies, the npm install command also downloaded the library code. As with other dependencies the code can be found in the nodemodules directory located in the root. As one might notice, nodemodules contains a fair bit of interesting stuff.
Let's make another addition. Install json-server as a development dependency, which is only used during development, by providing the command
npm install json-server --save-devand making a small addition to the scripts part of the package.json file
{
  // ...
  "scripts": {
    "start": "react-scripts start",
    "build": "react-scripts build",
    "test": "react-scripts test --env=jsdom",
    "eject": "react-scripts eject",
    "server": "json-server -p3001 db.json"  }
}
We can now conveniently, without parameter definitions, start the json-server from the project root directory with the command
npm run serverWe will get more familiar with the npm tool in the third part of the course.
NB the previously started json-server must be terminated before staring a new one, otherwise there will be trouble
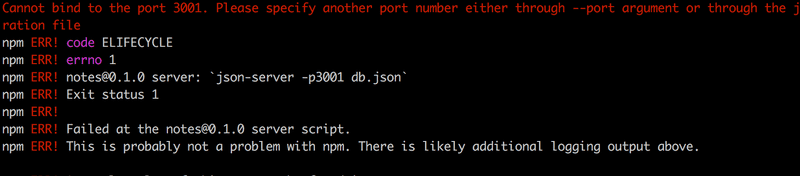
The red print in the error message informs us about the issue:
Cannot bind to the port 3001. Please specify another port number either through --port argument or through the json-server.json configuration file
as we can see the application is not able to bind itself to the port. The reason being that port 3001 is already occupied by the previously started json-server.
We used the command npm install twice, but with slight differences
npm install axios --save
npm install json-server --save-dev
There is a fine difference in the parameters. axios is installed as a runtime dependency (--save) of the application, because the execution of the program requires the existence of the library. On the other hand json-server was installed as a development dependency (--save-dev), since the program itself doesn't require it. It is used as assistance during software development. There will be more on different dependencies in the next part of the course.
Axios and promises
Now we are ready to use axios. Going forward, json-server is assumed to be running on port 3001.
The library can be brought into use like other libraries, e.g. React, are brought in with an appropriate import statement.
Add the following to the file index.js
import axios from 'axios'
const promise = axios.get('http://localhost:3001/notes')
console.log(promise)
const promise2 = axios.get('http://localhost:3001/foobar')
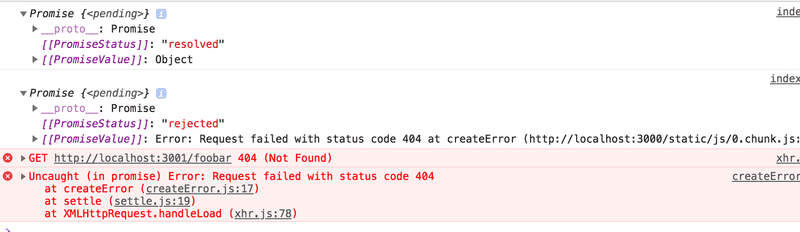
console.log(promise2)This should be printed to the console
Axios' method get returns a promise.
The documentation on Mozilla's site states the following about promises:
A Promise is an object representing the eventual completion or failure of an asynchronous operation.
On other words a promise is an object that represents an asynchronous operation. A promise can have three distinct states:
- first, the promise is pending, meaning the respective asynchronous operation has not yet occurred
- if the operation finishes successfully, then the promise will move its state to fulfilled, sometimes called resolved
- a third possible state is rejected, which represents a failed operation
The first promise in our example is fulfilled, representing a successful axios.get('http://localhost:3001/notes') request. The second one, however, is rejected, and the console will tell us the reason. It looks like we were trying to make a HTTP GET request to an address, which doesn't exist.
If and when we want to access the result of the operation represented by the promise, we must register an event handler to the promise. This is achieved using the method then:
const promise = axios.get('http://localhost:3001/notes')

promise.then(response => {
  console.log(response)
})
The following is printed to the console
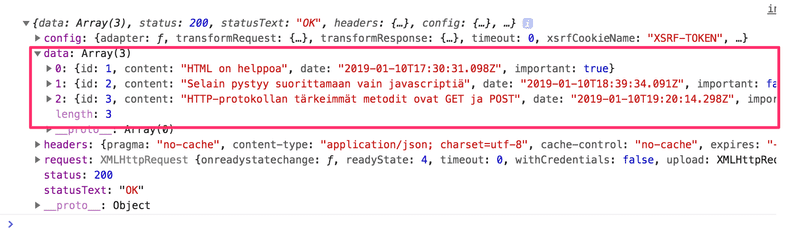
The Javascript runtime environment calls the callback function registered by the then method providing it with a result object as a parameter. The result object contains all the essential data related to the response of a HTTP GET request, which would include the returned data, status code and headers.
Rarely does one need to save the promise object to a variable, and it is common to chain the then method call right after the axios method call:
axios.get('http://localhost:3001/notes').then(response => {
  const notes = response.data
  console.log(notes)
})
The callback function now takes the data contained within the response, saves it to a variable and print the notes to the console.
A more readable way to format chained method calls is to place each call on its own line:
axios
  .get('http://localhost:3001/notes')
  .then(response => {
    const notes = response.data
    console.log(notes)
  })
this way a quick glance at the left side of the screen gives a decent picture of what's going on.
The data returned by the server is plaint text, basically just one long string. The axios library is still able to parse the data into a Javascript array, since the server has specified that the data format is application/json; charset=utf-8 (see previous image) using the content-type header.
Finally we can begin using data fetched from the server.
Let's first do it "poorly", which would mean putting the App component representing the application inside the callback function by modifying index.js as follows:
import ReactDOM from 'react-dom'
import React from 'react'
import App from './App'

import axios from 'axios'

axios.get('http://localhost:3001/notes').then(response => {
  const notes = response.data
  ReactDOM.render(
    <App notes={notes} />,
    document.getElementById('root')
  )
})
In some cases this way might be fine, but it is still a bit problematic. Instead we move the fetching of data into the App component.
However, it is not immediately obvious where among the component's code the command axios.get should be placed.
Effect-hookit
Olemme jo käyttäneet Reactin version 16.8.0 mukanaan tuomia state hookeja tuomaan funktioina määriteltyihin React-komponentteihin tilan. Versio 16.8.0 tarjoaa kokonaan uutena ominaisuutena myös effect hookit, dokumentaation sanoin
The Effect Hook lets you perform side effects in function components. Data fetching, setting up a subscription, and manually changing the DOM in React components are all examples of side effects.
Eli effect hookit ovat juuri oikea tapa hakea dataa palvelimelta.
Poistetaan nyt datan hakeminen tiedostosta index.js. Komponentille App ei ole enää tarvetta välittää dataa propseina. Eli index.js pelkistyy seuraavaan muotoon
ReactDOM.render(<App />, document.getElementById('root'))Komponentti App muuttuu seuraavasti:
import React, { useState, useEffect } from 'react'import axios from 'axios'import Note from './components/Note'

const App = () => {
  const [notes, setNotes] = useState([])
  const [newNote, setNewNote] = useState('')
  const [showAll, setShowAll] = useState(true)

  useEffect(() => {    console.log('effect')    axios      .get('http://localhost:3001/notes')      .then(response => {        console.log('promise fulfilled')        setNotes(response.data)      })  }, [])  console.log('render', notes.length, 'notes')
  // ...
}
Koodiin on myös lisätty muutama aputulostus, jotka auttavat hahmottamaan miten suoritus etenee.
Konsoliin tulostuu
render 0 notes
effect
promise fulfilled
render 3 notes
Ensin siis suoritetaan komponentin määrittelevan funktion runko ja renderöidään komponentti ensimmäistä kertaa. Tässä vaiheessa tulostuu render 0 notes eli dataa ei ole vielä haettu palvelimelta.
Efekti, eli funktio
() => {
  console.log('effect')
  axios
    .get('http://localhost:3001/notes')
    .then(response => {
      console.log('promise fulfilled')
      setNotes(response.data)
    })
}
suoritetaan heti renderöinnin jälkeen. Funktion suoritus saa aikaan sen, että konsoliin tulostuu effect ja että komento axios.get aloittaa datan hakemisen palvelimelta sekä rekisteröi operaatiolle tapahtumankäsittelijäksi funktion
response => {
  console.log('promise fulfilled')
  setNotes(response.data)
})
Siinä vaiheessa kun data saapuu palvelimelta, Javascriptin runtime kutsuu rekisteröityä tapahtumankäsittelijäfunktiota, joka tulostaa konsoliin promise fulfilled sekä tallettaa tilaan palvelimen palauttamat muistiinpanot funktiolla setNotes(response.data).
Kuten aina, tilan päivittävän funktion kutsu aiheuttaa komponentin uudelleen renderöitymisen. Tämän seurauksena konsoliin tulostuu render 3 notes ja palvelimelta haetut muistiinpanot renderöityvät ruudulle.
Tarkastellaan vielä efektihookin määrittelyä kokonaisuudessaan
useEffect(() => {
  console.log('effect')
  axios
    .get('http://localhost:3001/notes').then(response => {
      console.log('promise fulfilled')
      setNotes(response.data)
    })
}, [])
Kirjotetaan koodi hieman toisella tavalla.
const hook = () => {
  console.log('effect')
  axios
    .get('http://localhost:3001/notes')
    .then(response => {
      console.log('promise fulfilled')
      setNotes(response.data)
    })
}

useEffect(hook, [])
Nyt huomaamme selvemmin, että funktiolle useEffect annetaan kaksi parametria. Näistä ensimmäinen on funktio, eli itse efekti. Dokumentaation mukaan
By default, effects run after every completed render, but you can choose to fire it only when certain values have changed.
Eli oletusarvoisesti efekti suoritetaan aina sen jälkeen, kun komponentti renderöidään. Meidän tapauksessamme emme kuitenkaan halua suorittaa efektin kuin ensimmäisen renderöinnin yhteydessä.
Funktion useEffect toista parametria käytetään tarkentamaan sitä miten usein efekti suoritetaan. Jos toisena parametrina on tyhjä taulukko [], suoritetaan efekti ainoastaan komponentin ensimmäisen renderöinnin aikana.
Efektihookien avulla on mahdollisuus tehdä paljon muutakin kuin hakea dataa palvelimelta, tämä riittää kuitenkin meille tässä vaiheessa.
Mieti vielä tarkasti äsken läpikäytyä tapahtumasarjaa, eli mitä kaikkea koodista suoritetaan, missä järjetyksessä ja kuinka monta kertaa. Tapahtumien järjestyksen ymmärtäminen on erittäin tärkeää!
Huomaa, että olisimme voineet kirjoittaa efektifunktion koodin myös seuraavasti:
useEffect(() => {
  console.log('effect')

  const eventHandler = response => {
    console.log('promise fulfilled')
    setNotes(response.data)
  }

  const promise = axios.get('http://localhost:3001/notes')
  promise.then(eventHandler)
}, [])
Muuttujaan eventHandler on sijoitettu viite tapahtumankäsittelijäfunktioon. Axiosin metodin get palauttama promise on talletettu muuttujaan promise. Takaisinkutsun rekisteröinti tapahtuu antamalla promisen then-metodin parametrina muuttuja eventHandler, joka viittaa käsittelijäfunktioon. Useimmiten funktioiden ja promisejen sijoittaminen muuttujiin ei ole tarpeen ja ylempänä käyttämämme kompaktimpi esitystapa riittää:
useEffect(() => {
  console.log('effect')
  axios
    .get('http://localhost:3001/notes')
    .then(response => {
      console.log('promise fulfilled')
      setNotes(response.data)
    })
}, [])
Sovelluksessa on tällä hetkellä vielä se ongelma, että jos lisäämme uusia muisiinpanoja, ne eivät tallennu palvelimelle asti. Eli kun uudelleenlataamme sovelluksen, kaikki lisäykset katoavat. Korjaus asiaan tulee pian.
Sovelluksen tämän hetkinen koodi on kokonaisuudessaan githubissa, branchissa part2-4.
Sovelluskehityksen suoritusympäristö
Sovelluksemme kokonaisuuden konfiguraatiosta on pikkuhiljaa muodostunut melko monimutkainen. Käydään vielä läpi mitä tapahtuu missäkin. Seuraava diagrammi kuvaa asetelmaa
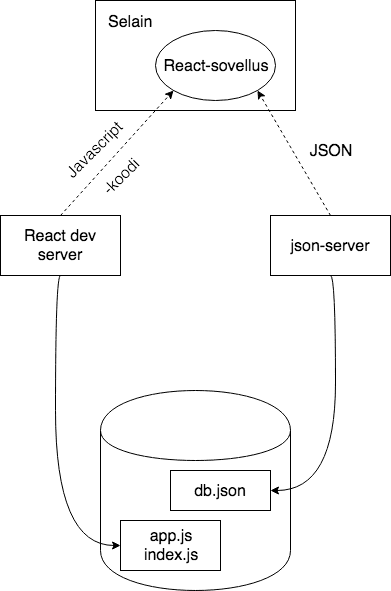
React-sovelluksen muodostavaa Javascript-koodia siis suoritetaan selaimessa. Selain hakee Javascriptin React dev serveriltä, joka on se ohjelma, mikä käynnistyy kun suoritetaan komento npm start. Dev-serveri muokkaa sovelluksen Javascriptin selainta varten sopivaan muotoon, se mm. yhdistelee eri tiedostoissa olevan Javascript-koodin yhdeksi tiedostoksi. Puhumme enemmän dev-serveristä kurssin osassa 7.
JSON-modossa olevan datan selaimessa pyörivä React-sovellus siis hakee koneella portissa 3001 käynnissä olevalta json-serveriltä, joka taas saa JSON-datan tiedostosta db.json.
Kaikki sovelluksen osat ovat näin sovelluskehitysvaiheessa ohjelmoijan koneella eli localhostissa. Tilanne muuttuu sitten kun sovellus viedään internettiin. Teemme näin osassa 3.
Tehtäviä
2.11: puhelinluettelo step6
Jatketaan puhelinluettelon kehittämistä. Talleta sovelluksen alkutila projektin juureen sijoitettavaan tiedostoon db.json:
{
  "persons": [
    {
      "name": "Arto Hellas",
      "number": "040-123456",
      "id": 1
    },
    {
      "name": "Martti Tienari",
      "number": "040-123456",
      "id": 2
    },
    {
      "name": "Arto Järvinen",
      "number": "040-123456",
      "id": 3
    },
    {
      "name": "Lea Kutvonen",
      "number": "040-123456",
      "id": 4
    }
  ]
}
Käynnistä json-server porttiin 3001 ja varmista selaimella osoitteesta http://localhost:3001/persons, että palvelin palauttaa henkilölistan.
Jos saat virheilmoituksen:
events.js:182
      throw er; // Unhandled 'error' event
      ^

Error: listen EADDRINUSE 0.0.0.0:3001
    at Object._errnoException (util.js:1019:11)
    at _exceptionWithHostPort (util.js:1041:20)
on portti 3001 jo jonkin muun sovelluksen, esim. jo käynnissä olevan json-serverin käytössä. Sulje toinen sovellus tai jos se ei onnistu, vaihda porttia.
Muuta sovellusta siten, että datan alkutila haetaan axios-kirjaston avulla palvelimelta. Hoida datan hakeminen Effect hookilla).
2.12* maiden tiedot, step1
Rajapinta https://restcountries.eu tarjoaa paljon eri maihin liittyvää tietoa koneluettavassa muodossa ns. REST-apina.
Tee sovellus, jonka avulla voit tarkastella eri maiden tietoja. Sovelluksen kannattaa hakea tiedot endpointista all.
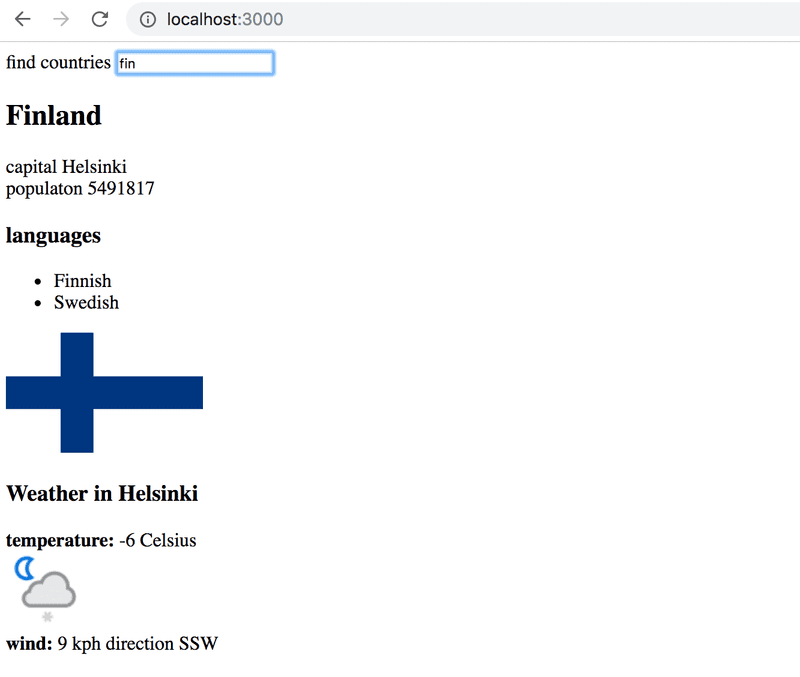
Sovelluksen käyttöliittymä on yksinkertainen. Näytettävä maa haetaan kirjoittamalla hakuehto etsintäkenttään.
Jos ehdon täyttäviä maita on liikaa (yli 10), kehoitetaan tarkentamaan hakuehtoa:

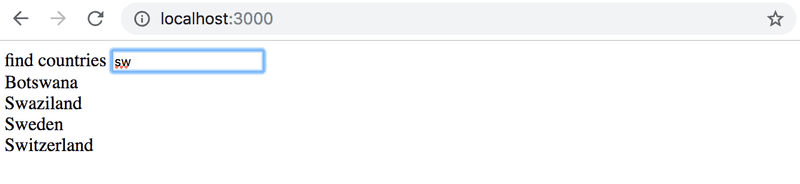
Jos maita on alle kymmenen, mutta yli 1 näytetään hakuehdon täyttävät maat:
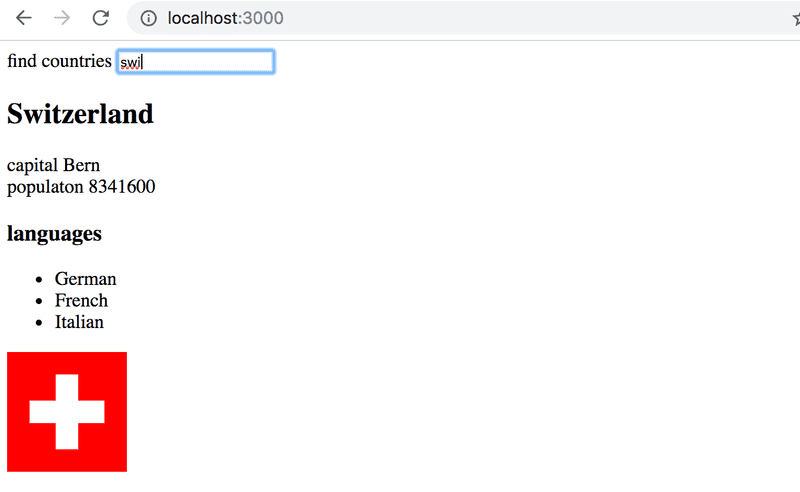
Kun ehdon täyttäviä maita on enää yksi, näytetään maan perustiedot, lippu sekä siellä puhutut kielet:
Huom: riittää että sovelluksesi toimii suurimmalle osalle maista. Jotkut maat kuten Sudan voivat tuottaa ongelmia, sillä maan nimi on toisen maan South Sudan osa. Näistä corner caseista ei tarvitse välittää.
VAROITUS create-react-app tekee projektista automaattisesti git-repositorion, ellei sovellusta luoda jo olemassaolevan repositorion sisälle. Todennäköisesti et halua että projektista tulee repositorio, joten suorita projektin juuressa komento rm -rf .git.
2.13*: maiden tiedot, step2
Tässä osassa on vielä paljon tekemistä, joten älä juutu tähän tehtävään!
Paranna edellisen tehtävän maasovellusta siten, että kun sivulla näkyy useiden maiden nimiä, tulee maan nimen viereen nappi, jota klikkaamalla pääsee suoraan maan näkymään:
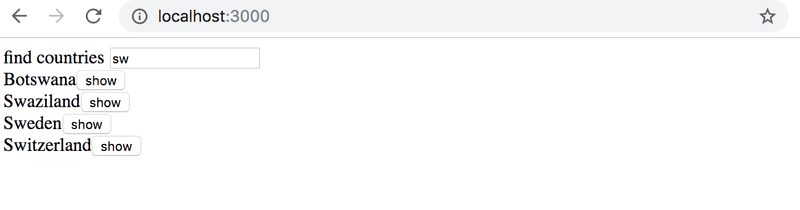
Tässäkin tehtävässä riittää, että ohjelmasi toimii suurella osalla maita ja maat joiden nimi sisältyy johonkin muuhun maahan, kuten Sudan voit unohtaa.
2.14*: maiden tiedot, step3
Tässä osassa on vielä paljon tekemistä, joten älä juutu tähän tehtävään!
Lisää yksittäisen maan näkymään pääkaupungin säätiedotus. Säätiedotuksen tarjoavia palveluita on kymmeniä. Itse käytin https://www.apixu.com:ia.